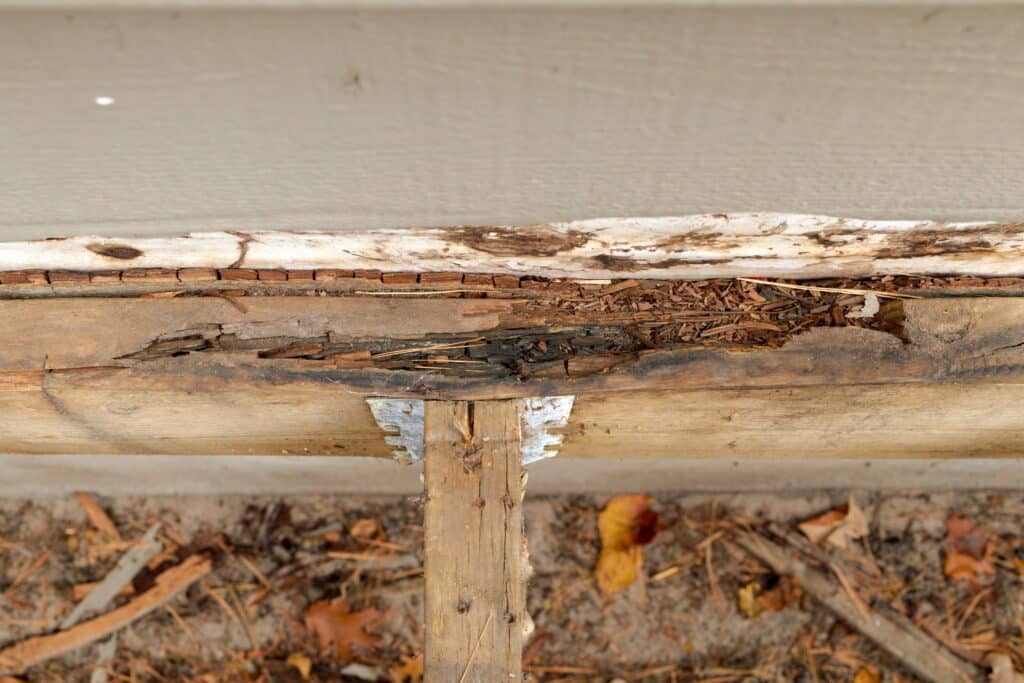
Welcome to the new CWC Digital Resource Hub (BETA)

en-ca

Articles

Stay updated with our latest insights and trends. Explore articles that inspire and inform.

98 results found...
Sort By Dropdown Icon

When you want to use wood that is not naturally decay resistant in a wet application (outdoors, for example) or where it may be at risk for insect attack, you need to specify preservative-treated wood. This is lumber that has been chemically treated to make it unattractive to fungi and other pests. In the same way that you would specify galvanized steel where it would be at risk of rusting, you specify treated wood where it will be used in a setting conducive to decay. 

Wood does not deteriorate just because it gets wet. When wood breaks down, it is because an organism is eating it as food. Preservatives work by making the food source inedible to these organisms.

Properly preservative-treated wood can have 5 to 10 times the service life of untreated wood. This extension of life saves the equivalent of 12.5% of Canada’s annual log harvest.

Preserved wood is used most often for railroad ties, utility poles, marine piles, decks, fences and other outdoor applications. Various treatment methods and types of chemicals are available, depending on the attributes required in the particular application and the level of protection needed.

Wood is composed of many small cellular tubes that are predominantly filled with air. The natural composition of the material allows for wood to act as an effective acoustical insulator and provides it with the ability to dampen vibrations. These sound-dampening characteristics allow for wood construction elements to be specified where sound insulation or amplification is required, such as libraries and auditoriums. Another important acoustical property of wood is its ability to limit impact noise transmission, an issue commonly associated with harder, more dense materials and construction systems.

The use of topping or a built-up floating floor system overlaid on light wood frame or mass timber structural elements is a common approach to address acoustic separation between floors of a building. Depending on the type of materials in the built-up floor system, the topping can be applied directly to the wood structural members or over top of a moisture barrier or resilient layer. The use of gypsum board, absorptive (batt/loose-fill) insulation and resilient channels are also critical components of a wood-frame wall or floor assembly that also contribute to the acoustical performance of the overall assembly.

Acoustic design considers a number of factors, including building location and orientation, as well as the insulation or separation of noise-producing functions and building elements. Sound Transmission Class (STC), Apparent Sound Transmission Class (ASTC) and Impact Insulation Class (IIC) ratings are used to establish the level of acoustic performance of building products and systems. The different ratings can be determined on the basis of standardized laboratory testing or, in the case of ASTC ratings, calculated using methodologies described in the NBC.

Currently, the National Building Code of Canada (NBC) only regulates the acoustical design of interior wall and floor assemblies that separate dwelling units (e.g. apartments, houses, hotel rooms) from other units or other spaces in a building. The STC rating requirements for interior wall and floor assemblies are intended to limit the transmission of airborne noise between spaces. The NBC does not mandate any requirements for the control of impact noise transmission through floor assemblies. Footsteps and other impacts can cause severe annoyance in multifamily residences. Builders concerned about quality and reducing occupant complaints will ensure that floors are designed to minimize impact transmission.

Beyond conforming to the minimum requirements of the NBC in residential occupancies, designers can also establish acoustic ratings for design of non-residential projects and specify materials and systems to ensure the building performs at that level. In addition to limiting transmission of airborne noise through internal structural walls and floors, flanking transmission of sound through perimeter joints and sound transmission through non-structural partition walls should also be considered during the acoustical design.

Further information and requirements related to STC, ASTC and IIC ratings are provided in Appendix A of the NBC in sections A-9.10.3.1. and A-9.11.. This includes, inter alia, Tables 9.10.3.1-A and 9.10.3.1.-B that provide generic data on the STC ratings of different types of wood stud walls and STC and IIC ratings for different types of wood floor assemblies, respectively. Tables A-9.11.1.4.-A to A-9.11.1.4.-D present generic options for the design and construction of junctions between separating and flanking assemblies. Constructing according to these options is likely to meet or exceed an ASTC rating of 47 that is mandated by the NBC. Table A-Table 9.11.1.4. presents data about generic floor treatments that can be used to improve the flanking sound insulation performance of lightweight framed floors, i.e., additional layers of material over the subfloor (e.g. concrete topping, OSB or plywood) and finished flooring or coverings (e.g., carpet, engineered wood).

Adhesives can also be referred to as resins.

Many engineered wood products, including finger-joined lumber, plywood, oriented strand board (OSB), glulam, cross-laminated timber (CLT), wood I-joists and other structural composite lumber products, require the use of adhesives to transfer the stresses between adjoining wood fibres. Waterproof adhesives and heat resistant adhesives are commonly used in the manufacture of structural wood products.

Advances in adhesive technology to address challenges associated with increased production rates, visual appearance, process emissions and environmental impact concerns, have resulted in a wider range of innovative structural adhesive products. It is imperative that this new generation of adhesives achieve the same level of performance as traditional structural wood product adhesives such as phenol-formaldehyde (PF) or phenol-resorcinol formaldehyde (PRF).

Examples of different structural wood product adhesives families include, but are not limited to:

  • Emulsion polymer isocyanate (EPI);
  • One-component polyurethane (PUR);
  • Phenolic resins such as phenol-formaldehyde (PF) and phenol-resorcinol formaldehyde (PRF).

Various types of extenders such as walnut shell flour, Douglas fir bark flour, alder bark flour, and wood flour are sometimes used to reduce cost, control penetration into the wood fibre or moderate strength properties for the specific materials being bonded.

There are several industry standards that may be used to evaluate the performance of structural wood product adhesives, including:

CSA O112.6
Phenol and phenol-resorcinol resin adhesives for wood (high-temperature curing)

CSA O112.7
Resorcinol and phenol-resorcinol resin adhesives for wood (room- and intermediate-temperature curing)

CSA O112.9
Evaluation of adhesives for structural wood products (exterior exposure)

CSA O112.10
Evaluation of adhesives for structural wood products (limited moisture exposure)

CAN/CSA O160
Formaldehyde emissions standard for composite wood products

ASTM D7247
Standard Test Method for Evaluating the Shear Strength of Adhesive Bonds in Laminated Wood Products at Elevated Temperatures

ASTM D7374
Standard Practice for Evaluating Elevated Temperature Performance of Adhesives Used in End-Jointed Lumber

Holes drilled to apply depot, supplementary or remedial treatments should be on vertical surfaces or undersides, where possible, to avoid creating additional routes for moisture entry. In the case of supplementary treatment, cut ends should be placed so they are not in ground contact where possible.

Holes for treatment should not be drilled below ground level if it can possibly be avoided. All holes should be closed with a tight-fitting plug. Ideally this should be removable to allow re-treatment. Holes for water-soluble treatments should be placed in the right locations to intercept moisture close to its points of entry. Look carefully at the structure and think about moisture sources, water traps, moisture entry points, moisture flow and signs of moisture entry.

Moisture sources include direct rainfall, diverted rainfall (via windows, cladding, balcony and walkway surfaces, roof overhangs, flashing, parapets, eavestroughs and downspouts), rain penetration of moisture barriers via nail holes, splits, failure of joints or deterioration of caulking, rain splash, blowing snow, ice dams, condensation, concrete foundations, soil contact, irrigation systems, drain and plumbing leaks.

Water traps include metal “shoes”, V joints, checks, appressed boards, cupped horizontal surfaces and anywhere a rim is created at the edge of a horizontal surface. Accumulation of dirt and debris often indicates a water trap. Growth of algae also indicates locations where moisture hangs around longer after rain.

Moisture entry points include all locations with end grain, around nails, screws and bolts plus any other holes or penetrations, checks and delaminations.

Moisture flow in wood may be 100 to 1000 times faster along than across the grain. Patterns of moisture distribution in wood are therefore commonly elongated cones or lens shapes centred on the point of entry.

Signs of moisture entry include swelling, darker colouration, fungal stain, iron stain around fasteners, nail popping and flaking of film-forming surface finishes. Confirmation of moisture contents conducive to decay can be made using electrical-resistance type moisture meters. Capacitance-type moisture meters may also be useful, but these can give erroneous results in the area of metal fittings.

Click Here for more information of field treatment

60Sometimes it happens – wood in service suffers from decay. How can you identify decayed wood and what are the recommended actions to take? First, be sure you actually have decay. The wood may only be harmlessly discoloured, for any number of reasons. See the publication in the side bar for help if your wood is stained but you’re not sure why.

If wood is badly decayed, this will be quite obvious. The wood will be softer than normal and perhaps even be breakable by hand. Decayed wood often has a colour change, either darker or lighter than normal, although this could be due to weathering or could just be a stain. The wood may display an unexpected cracking pattern, or may look stringy- this is a sign of fairly advanced decay. If fungal growth is visible on the surface, the wood has quite likely already suffered strength loss even if this isn’t visibly obvious. However, do not rely on visual cues alone.

Wood can appear stained and yet be sound, or can appear normal yet have already suffered significant strength loss due to decay. Some researchers or engineers use the pick test to determine if the wood is sound. They insert the point of a knife at a shallow angle to the surface and attempt to lever up a thin splinter. If the wood splinters with longer fragments, it is likely sound. If instead it breaks or crumbles in small pieces over the blade, it could be decayed. Decayed wood breaks somewhat like a carrot snapping in half, at one section, versus the splintering along the length of sound wood. See our Biodeterioration page to learn more about the science of decay.

Articles

If you are still unsure whether or not you have decayed wood, you are advised to seek help from a wood restoration specialist.

How urgent is a decay problem? By the time you notice decay, the wood typically has lost substantial strength already. In cases where the decayed wood is supporting load you are strongly advised to contact a structural engineer or other appropriate expert to more thoroughly assess the problem and proceed with a repair.

A small, localized and non-critical case of decay may be a do-it-yourself project under some conditions. All decayed wood should be removed. If you are unable to remove the entire affected piece, remove the decayed portion plus an additional portion of adjacent wood beyond the visible decay. A rule of thumb is to remove an additional two feet (60 cm) of adjacent wood from each side, although this will of course depend on the extent of the decay. The removal of adjacent wood is because the fungus may have extended deep into the wood beyond the area of decay and may be ready to cause more damage in adjacent sound wood.

Then apply a field treatment to the remaining adjacent wood, such as a borate solution in roll-on, rod or paste form, before replacing the removed pieces. Use treated or naturally durable wood to replace the removed pieces. If damaged wood must be left in place, a penetrating epoxy can sometimes be applied as a stabilizer. In those cases and for best results in all wood repair projects we recommend you consult with a wood restoration expert.

Indoors, it is extremely important that you find the source(s) of the moisture that allowed wood decay fungi to grow. If you had wood decay in a location that is supposed to be dry, then you have a leak or a condensation problem that needs fixing to prevent any future problems. Look for primary and secondary sources of moisture. A short term leak may have allowed decay to start, for example, and condensation may be sustaining the decay. If the location of the decayed wood was outdoors or in a wet location, you need to use treated or naturally durable wood.

If you have building moisture problems on a large scale, you need to hire some experts and be prepared for a potentially substantial remediation project. Seek out a qualified consultant, who will begin by using a variety of techniques and tools to determine the extent of the damage. This will include a visual examination for staining, bulging, cracking, presence of water, and warping. Subsurface moisture penetration will be tested with probes and/or thermography.

In a building with wood structural members, the consultant will probably use a moisture meter to sample wetness of structural wood components in several locations. Based on the results of this investigation, the consultant will recommend a course of action for repair and future prevention. Canada Mortgage and Housing Corporation has developed a guide for building envelope rehabilitation, in two volumes: one for owners, one for consultants.

More Information
Click Here for a fact sheet Discolourations on wood products: Causes and Implications for help if your wood is stained and you’re not sure why.
Click here for more information on biodeterioration and the science of decay.
Click here for more information on remedial treatments.
Click here for links on decay assessment and other durability topics

Types de murs permettant de contrôler l’eau

En règle générale, les experts en enveloppes de bâtiment considèrent qu’il existe trois ou quatre approches différentes pour la conception de murs au profit du contrôle de l’humidité. Les murs avec barrière d’étanchéité en surface sont conçus de façon à obtenir une étanchéité à l’eau et à l’air à la surface du parement. Un exemple de ceci serait le stuc appliqué directement sur le revêtement ou la maçonnerie, sans membrane d’étanchéité comme le papier de construction. Les joints entre le parement et les interfaces, et les autres composants, sont scellés afin d’assurer la continuité. La face extérieure du parement est la principale et unique voie d’évacuation de l’eau. Il n’y a pas de renfort pour le contrôle de l’humidité, c.-à-d. qu’il n’y a pas de système complémentaire. Un système d’étanchéisation en surface doit être construit et maintenu en parfaite condition afin de contrôler efficacement l’infiltration de l’eau de pluie. En général, ces murs sont recommandés uniquement dans les situations où les risques sont faibles, comme les zones murales situées sous de larges avant-toits ou là où le climat est sec. Les murs dotés d’une membrane dissimulée sont conçus dans la perspective où il est possible qu’un peu d’eau s’infiltre au-delà de la surface du parement. L’intérieur de ces murs comporte un dispositif d’évacuation de l’eau, en guise de deuxième ligne de défense contre l’eau de pluie.

La face du parement reste la voie d’évacuation principale, mais une évacuation secondaire est exécutée à l’intérieur du mur. Le dispositif de drainage se compose d’une membrane comme du papier de construction, qui achemine l’eau jusqu’en bas et à l’extérieur du mur. Un bardage ou du stuc appliqué sur du papier de construction constitue un exemple d’un tel dispositif. Les murs comptant une membrane dissimulée sont appropriés aux endroits modérément exposés à la pluie et au vent. Les murs à écran pare-pluie vont un pas plus loin dans le contrôle de l’eau, en incorporant une cavité entre le dos du parement et le papier de construction. Le vide d’air ventile le dos du parement et l’aide à s’assécher. De plus, la cavité fait office de coupure capillaire entre le parement et le papier de construction, empêchant ainsi la majeure partie de l’eau d’entrer en contact avec le papier. Un mur avec stuc ou parement appliqué sur la fourrure verticale par-dessus le papier de construction constitue un bon exemple de mur à écran pare-pluie. De tels murs conviennent à des bâtiments fortement exposés à la pluie et au vent. L’écran pare-pluie à pression équilibrée constitue l’un des progrès de la technologie des écrans pare-pluie. Ces murs font appel à des orifices pour équilibrer la pression entre l’air extérieur et celui de la cavité, éliminant ainsi l’une des forces favorisant la pénétration de l’eau (lorsque celle-ci est poussée au travers des fissures en raison de la pression élevée à la surface du mur et de la pression basse dans la cavité). Ces murs sont réservés aux endroits où les risques d’exposition sont très élevés.

Importance des avant-toits

Lorsque le climat est pluvieux, un avant-toit constitue l’un des moyens les plus simples et efficaces de réduire le risque d’infiltration de l’eau. Un avant-toit peut être comparé à un parapluie pour les murs, et plus il est large, mieux c’est. Une étude sur les bâtiments aux prises avec des problèmes de fuites en Colombie-Britannique, demandée par la Société canadienne d’hypothèques et de logement en 1996, a démontré la forte corrélation inverse entre la largeur d’un avant-toit et le pourcentage de murs problématiques. Par contre, même un avant-toit étroit peut aider à protéger le mur, en grande partie en raison de son effet sur la pluie battante. L’un des avantages importants mésestimés des avant-toits et des toits à double pente est leur effet sur la pression du vent. En règle générale, la pluie poussée par le vent est la plus grande source d’humidité dans les murs. Un avant-toit ou une toiture inclinée aidera à rediriger le vent vers le haut et par-dessus le bâtiment, réduisant ainsi la pression sur le mur et, par conséquent, force de la pluie battante qui martèle le mur. L’eau sera donc moins susceptible d’être poussée par le vent dans les fissures du mur.

Minimiser les orifices

La grande majorité des problèmes causés par l’eau pluviale est attribuable à l’eau qui s’infiltre par les trous des murs. Si aucune mesure n’est prise pour remédier aux irrégularités de l’enveloppe, l’eau pourra s’infiltrer par exemple autour des cadrages de fenêtres et du conduit d’évacuation de la sécheuse, aux intersections comme les balcons et les parapets, et aux joints du papier de construction. Une conception détaillée et une construction soigneuse sont donc essentielles! Tout comme l’est l’entretien des éléments d’étanchéité de courte durée, comme le mastic de calfeutrage autour des cadrages de fenêtres. Le BC Housing-Homeowner Protection Office a mis à jour le « Best Practice Guide for Wood-Frame Envelopes in the Coastal Climate of British Columbia », initialement conçu par la Société canadienne d’hypothèques et de logement, et a publié le « Building Enclosure Design Guide for Wood-Frame Multi-Unit Residential Buildings », qui comprend des renseignements exhaustifs sur la conception et la construction.

Utilisez notre calculatrice de résistance effective non seulement pour établir la résistance thermique des murs, mais également pour procéder à une évaluation de leur durabilité en fonction des conditions climatiques représentatives à l’échelle du Canada.

Publications associées
Pour obtenir des conseils en ligne sur la conception et la construction, consultez ce qui suit : Le programme « Build a Better Home », dirigé par l’APA – The Engineered Wood Association, anime des cours de formation, présente des maisons témoins et offre des publications. Le site Web fournit des renseignements sur la construction, de même que des liens vers toutes les publications pertinentes de l’APA.
Articles
Building Enclosure Design Guide Guide: Wood-Frame Multi-Unit Residential Buildings.

Articles

Bolts are widely used in wood construction. They are able to resist moderately heavy loads with relatively few connectors.

Bolts may be used in wood-to-wood, wood-to-steel and wood-to-concrete connection types. Some typical structural applications for bolts include:

  • purlin to beam connections
  • beam to column connections
  • column to base connections
  • truss connections
  • timber arches
  • post and beam construction
  • pole-frame construction
  • timber bridges
  • marine structures

Several types of bolts as shown in Figure 5.10 below, are used for wood construction with the hexagon head type being the most common. Countersunk heads are used where a flush surface is desired. Carriage bolts can be tightened by turning the nut without holding the bolt since the shoulders under the head grip the wood.

Bolts are commonly available in imperial diameters of 1/4, 1/2, 5/8, 3/4, 7/8 and 1 inch. Bolts are installed in holes drilled slightly (1 to 2 mm) larger than the bolt diameter to prevent any splitting and stress development that could be caused by installation or subsequent wood shrinkage. Depending on the diameter, bolts are available in lengths from 75 mm (3″) up to 400 mm (16″) with other lengths available on special order.

Bolts can be dipped or plated, at an additional cost, to provide resistance to corrosion. In exposed conditions and high moisture environments, corrosion should be resisted by using hot dip galvanized or stainless steel bolts, washers and nuts.

Washers are commonly used with bolts to keep the bolt head or nut from crushing the wood member when tightening is taking place. Washers are not required with a steel side plate, as the bolt head or nut bears directly on the steel. Common types of washers are shown in Figure 5.11 below.

Design information provided in CWC’s Wood Design Manual is based on bolts conforming to the requirements of ASTM A307 Standard Specification for Carbon Steel Bolts, Studs, and Threaded Rod 60 000 PSI Tensile Strength or Grade 2 bolts and dowels as specified under SAE J429 Mechanical and Material Requirements for Externally Threaded Fasteners.


Articles

Articles

Download Figure 5.10 (and 5.11) as a PDF.

Les ponts en bois sont depuis longtemps des éléments essentiels des réseaux routiers, ferroviaires et forestiers du Canada. Dépendant de la disponibilité des matériaux, de la technologie et de la main-d’œuvre, la conception et la construction des ponts en bois ont évolué de manière significative au cours des 200 dernières années dans toute l’Amérique du Nord. Les ponts en bois prennent de nombreuses formes et utilisent différents systèmes de support, notamment des ponts en rondins à portée simple, différents types de ponts à treillis, ainsi que des tabliers et des éléments de pont en matériaux composites ou stratifiés. Les ponts en bois restent un élément important de notre réseau de transport au Canada.

Les avantages de la construction de ponts en bois modernes sont les suivants :

  • un coût initial réduit, en particulier pour les régions éloignées ;
  • la rapidité de la construction, grâce à l’utilisation de la préfabrication ;
  • avantages en matière de durabilité ;
  • l’esthétique ;
  • des fondations plus légères ;
  • des charges sismiques plus faibles, associées à des connexions moins complexes avec les sous-structures ;
  • les structures temporaires et les grues de plus petite taille ; et
  • des coûts de transport moins élevés associés à des matériaux moins lourds.

Les différents types de matériaux utilisés pour la construction des ponts en bois sont les suivants : bois de sciage, rondins, bois lamellé-collé droit et courbe (lamellé-collé), bois de placage stratifié (LVL), bois à copeaux parallèles (PSL), bois lamellé-croisé (CLT), bois lamellé-cloué (NLT) et systèmes composites tels que les tabliers stratifiés sous contrainte, les tabliers stratifiés bois-béton et les polymères renforcés par des fibres.

Les deux principales essences de bois utilisées pour la construction de ponts en bois au Canada sont le sapin de Douglas et la combinaison d’essences épicéa-pin-sapin. D’autres espèces appartenant aux combinaisons d’espèces Hem-Fir et Northern sont également reconnues par la norme CSA O86, mais elles sont moins couramment utilisées dans la construction de ponts.

Toutes les fixations métalliques utilisées pour les ponts doivent être protégées contre la corrosion. La méthode la plus courante pour assurer cette protection est la galvanisation à chaud, un processus par lequel un métal sacrificiel est ajouté à l’extérieur de la fixation. Les différents types de fixations utilisés dans la construction de ponts en bois comprennent, entre autres, les boulons, les tire-fonds, les anneaux fendus, les plaques de cisaillement et les clous (pour les stratifiés de pont uniquement).

Tous les ponts routiers au Canada doivent être conçus pour répondre aux exigences des normes CSA S6 et CSA O86. La norme CSA S6 exige que les principaux éléments structurels de tout pont au Canada, quel que soit le type de construction, soient capables de résister à un minimum de 75 ans de charge pendant sa durée de vie.

Le style et la portée des ponts varient considérablement en fonction de l’application. Dans les endroits difficiles d’accès et les vallées profondes, les ponts à chevalets en bois étaient courants à la fin des années 19th siècle et au début des années 20th siècle. Historiquement, les ponts à chevalets dépendaient fortement de l’abondance des ressources en bois et, dans certains cas, étaient considérés comme temporaires. La construction initiale des chemins de fer transcontinentaux d’Amérique du Nord n’aurait pas été possible sans l’utilisation de bois pour construire les ponts et les chevalets.

De nombreux exemples de ponts en bois à treillis ont été construits depuis plus d’un siècle. Les ponts à poutres en treillis permettent des portées plus longues que les ponts à poutres simples et, historiquement, leurs portées étaient comprises entre 30 et 60 m (100 et 200 pieds). Les ponts conçus avec des fermes situées au-dessus du tablier offrent une excellente occasion de construire un toit au-dessus de la chaussée. L’installation d’un toit au-dessus de la chaussée est un excellent moyen d’évacuer l’eau de la structure principale du pont et de la protéger du soleil. La présence de ces toits est la principale raison pour laquelle ces ponts couverts centenaires sont encore en service aujourd’hui. Le fait qu’ils fassent toujours partie de notre paysage témoigne autant de leur robustesse que de leur attrait.

Bien que conçue à l’origine comme une mesure de réhabilitation des tabliers de ponts vieillissants, la technique de stratification sous contrainte a été étendue aux nouveaux ponts par l’application de contraintes au moment de la construction initiale. Les tabliers stratifiés sous contrainte offrent un meilleur comportement structurel, grâce à leur excellente résistance aux effets des charges répétées.

Les trois principales considérations liées à la durabilité des ponts en bois sont la protection par la conception, le traitement de préservation du bois et les éléments remplaçables. Un pont peut être conçu de manière à s’auto-protéger en détournant l’eau des éléments structurels. Le bois traité a la capacité de résister aux effets des produits chimiques de déglaçage et aux attaques des agents biotiques. Enfin, le pont doit être conçu de manière à ce que, à un moment donné, un seul élément puisse être remplacé relativement facilement, sans perturbation ni coût importants.


Pour plus d’informations, consultez les ressources suivantes :

  • Ponts routiers en bois (Conseil canadien du bois)
  • Guide de référence sur les ponts en bois de l’Ontario (Conseil canadien du bois)
  • CSA S6 Canadian Highway Bridge Design Code
  • CSA O86 Conception technique du bois

Wall Types for Water Control

Building envelope experts generally speak of three or four different approaches to design of a wall for moisture control. Face seal walls are designed to achieve water tightness and air tightness at the face of the cladding. An example would be stucco applied directly to sheathing or masonry without a moisture barrier membrane such as building paper. Joints in the cladding and interfaces with other wall components are sealed to provide continuity. The exterior face of the cladding is the primary – and only – drainage path. There is no moisture control redundancy, i.e., there is no back-up system. A face seal system must be constructed and maintained in perfect condition to effectively control rain water intrusion. In general, these walls are only recommended in low risk situations, such as wall areas under deep overhangs or in dry climates. Concealed barrier walls are designed with an acceptance that some water may pass beyond the surface of the cladding. These walls incorporate a drainage plane within the wall assembly, as a second line of defense against rain water.

The face of the cladding remains the primary drainage path, but secondary drainage is accomplished within the wall. This drainage plane consists of a membrane such as building paper, which carries water down and out of the wall assembly. An example is siding or stucco applied over building paper. Concealed barrier walls are appropriate in areas of low to moderate exposure to rain and wind. Rainscreen walls take water management one step further by incorporating a cavity between the back of the cladding and the building paper. This airspace ventilates the back of the cladding, helping it to dry out. The cavity also acts as a capillary break between cladding and building paper, thereby keeping most water from making contact with the building paper. An example of a rainscreen wall is stucco or siding applied to vertical strapping over the building paper. Rainscreen walls are appropriate in high rain and wind exposures. An advancement of the rainscreen technology is the pressure-equalized rainscreen. These walls use vents to equalize the pressure between the exterior and the cavity air, thereby removing one of the driving forces for water penetration (when it is pushed through cracks due to high pressure on the face of the wall and low pressure in the cavity). These walls are for very high risk exposures.

Importance of an Overhang

In a rainy climate, an overhang is one of the simplest and most effective ways to reduce the risk of water intrusion. An overhang is an umbrella for the wall, and the deeper the better. A survey of leaky buildings in British Columbia commissioned by Canada Mortgage and Housing Corporation in 1996 showed a strong inverse correlation between depth of overhang and percent of walls with problems. However, even a small overhang can help protect the wall, largely due to its effect on driving rain. One important benefit of overhangs and peaked roofs often not appreciated is the effect of these elements on wind pressure. Wind-driven rain is typically the largest source of moisture for walls. An overhang and/or sloped roof will help direct the wind up and over the building, which reduces the pressure on the wall and thereby reduces the force of the driving rain striking the wall. This means water is less likely to be pushed by wind through cracks in the wall.

Minimize the Holes

Most rainwater problems are due to water leaking into the wall through holes. If care isn’t taken to protect discontinuities in the envelope, water can leak around window framing and dryer vents, at intersections like balconies and parapets, and at building paper joints, for example. Good design detailing and careful construction is critical! So is maintenance of short-life sealants like caulk around window frames. BC Housing-Homeowner Protection Office has updated the “Best Practice Guide for Wood-Frame Envelopes in the Coastal Climate of British Columbia” originally developed by Canada Mortgage and Housing Corporation and published “Building Enclosure Design Guide for Wood-Frame Multi-Unit Residential Buildings” with extensive information on design and construction detailing.

Use our Effective R calculator to determine not only the thermal resistance of walls, but also a durability assessment of the wall based on representative climate conditions across Canada.

Related Publications
For on-line design and construction tips, try the following:The Build a Better Home program, operated by APA-The Engineered Wood Association, runs training courses, operates a demonstration houses, and offers publications. The web site offers construction information and provides links to all relevant APA publications.

Articles

Building Enclosure Design Guide: Wood-Frame Multi-Unit Residential Buildings.

Articles


Canada has had a wood preservation industry for about 100 years.  Canada is tied with the UK as the world’s second largest producer of treated wood (the USA is first, by a large margin).  In 1999, the most recent year for which we have data, Canada produced 3.5 million cubic metres of treated wood.  There are about 65 treating plants in Canada.

As with most other industrialized countries, Canada developed a wood preservation industry using creosote, initially to service railroads (the ties holding the rails) and then utilities (power poles).  Creosote production began declining by the 1950s, and by the 1970s was being somewhat replaced for these traditional uses by pentachlorophenol.  Today, these oil-borne preservatives only constitute 17% of Canadian treated wood production.

The remaining 83% of production uses water-borne preservatives such as CCA, ACQ and CA.  The industry began its substantial shift to the water-borne products in the 1970s, as consumer interest in decks and other residential outdoor structures dramatically increased.  For many years, CCA was by far the dominant preservative for both residential and industrial applications.

In 2004, CCA regulations were changed such that CCA is no longer available for many residential applications.  Subsequently, Canadian treaters have shifted about 80% of their previous CCA production to ACQ or CA.

Most of Canada’s treated wood is used domestically; Canada exports only 10% of its production.

Canada has its own wood preservation standards, supports several technical and marketing organizations, and maintains a lead position in certain areas of wood preservation research.  A major focus of the industry has been in response to increasing levels of health and environmental protection regulations.

Canadian species of visually graded lumber

There are more than a hundred softwood species in North America. To simplify the supply and use of structural softwood lumber, species having similar strength characteristics, and typically grown in the same region, are combined. Having a smaller number of species combinations makes it easier to design and select an appropriate species and for installation and inspection on the job site. In contrast, non-structural wood products are graded solely on the basis of appearance quality and are typically marked and sold under an individual species (e.g., Eastern White Pine, Western Red Cedar).

The Spruce-Pine-Fir (S-P-F) species group grows abundantly throughout Canada and makes up by far the largest proportion of dimension lumber production. The other major commercial species groups for Canadian dimension lumber are Douglas Fir-Larch, Hem-Fir and Northern Species.

The four species groups of Canadian lumber and their characteristics are shown below.

Species Combination: Douglas Fir-Larch
Abbreviation: D.Fir-L or DF-L
Species Included in Combination Growth Region
Douglas FirDouglas Fir icon   Western LarchWestern Larch icon Map of Canada highlighting region of southern BC and Alberta where Douglas Firs and Western Larchs Grow
Characteristics Colour Ranges
  • Reddish brown to yellow
  • High degree of hardness
  • Good resistance to decay
close-up view of reddish brown wood
Species Combination: Hem-Fir
Abbreviation: Hem-Fir or H-F
Species Included in Combination Growth Region
Pacific Coast HemlockPacific Coast Hemlock icon    Amabilis Fir Amabilis Fir icon Map of Canada highlighting BC and Alberta where Pacific Hemlock and Amabilis Fir Grow
Characteristics Colour Ranges
  • Yellow brown to white
  • Works easily
  • Takes paint well
  • Holds nails well
  • Good gluing characteristics
close-up view of yellow brown to white wood
Species Combination: Spruce-Pine-Fir
Abbreviation: S-P-F
Species Included in Combination Growth Region
White Spruce White Spruce icon  Engleman Spruce Engleman Spruce icon    Red SpruceRed Spruce icon   Black Spruce Black Spruce icon
Jack PineJack Pine icon   Lodgepole Pine Lodgepole Pine icon  Balsam Fir Balsam Fir icon   Alpine Fir  Alpine Fir icon
 Map of Canada showing that these species grow in all regions.
Characteristics Colour Ranges
  • White to pale yellow
  • Works easily
  • Takes paint well
  • Holds nails well
  • Good gluing charateristics
 close-up view of white to pale yellow wood board
 Species Combination: Northern Species
Abbreviation: North or Nor
 Species Included in Combination  Growth Region
 Western Red CedarWestern Red Cedar icon  Map of Canada highlighting BC and Alberta as regions where Western red Cedar grows.
Characteristics  Colour Ranges
  •  Reddish brown heartwood, light sapwood
  • Exceptional resistance to decay
  • Moderate strength
  • High in appearance qualities
  • Works easily
  • Takes fine finishes
  • Lowest shrinkage
 close-up view of reddish brown wood board
 Also Included in Northern Species
 Species Included in Combination  Growth Region
 Red Pinered pine icon  Map of Canada highlighting Ontario, Southern Quebec and the Maritimes as regions where Red Pines grow.
  Characteristics  Colour Ranges
  • Works easily
 close-up view of reddish yellow red pine board
 Also Included in Northern Species
 Species Included in Combination Growth Region
 Ponderosa PinePonderosa Pine icon  Map of Canada highlighting the Alberta region where Ponderosa Pines grow.
 Characteristics  Colour Ranges
  •  Takes finishes well
  • Holds nails well
  • Holds screws well
  • Seasons with little checking or cupping
 close-up view of ponderosa pine board
 Also Included in Northern Species
 Species Included in Combination  Growth Region
 Western White PineWestern White Pine icon  Eastern White Pine Eastern White Pine icon  Map of Canada highlighting BC, Ontario, Quebec and Maritimes as regions of growth for White Pine trees.
 Characteristics  Colour Ranges
  •  Creamy white to light straw brown heartwood, almost white sapwood
  • Works easily
  • Finishes well
  • Doeasn’t tend to split or splinter
  • Holds nails well
  • Low shrinkage
  • Takes stain, paints & varnishes well
 close-up view of white pine board
 Also Included in Northern Species
 Species Included in Combination  Growth Region
 Trembling AspenTrembling Aspen icon  Largetooth AspenLargetooth Aspen icon  Balsam Poplar Balsam Poplar icon  Map of Canada highlighting all provinces except BC as regions where Trembling Aspen, Largetooth Aspen and Balsam Poplar grow.
 Characteristics  Colour Ranges
  • Works easily
  • Finishes well
  • Holds nails well
 Amabilis Fir icon

Below is a map of the forest regions in Canada and the principal tree species that grow in each region.

Articles
Click to enlarge the map.
This map appears courtesy of Natural Resources Canada.

Choosing a coating depends on what appearance is desired and what level of maintenance would be tolerable.  For many people, the basic choice is paint versus stain. The trade-off is often between maintenance frequency and appearance.

For many people, additional criteria include VOC emissions, ease of clean up, and cost.  See our Links page for web sites and books with detailed information on choosing and applying wood finishes.  Read our About exterior wood coatings page for an understanding of the differences between paints and stains, pigmented versus clear coatings, and so forth.

Because exterior wood shrinks and swells with moisture changes, the coating needs to be flexible. Flexibility varies by product – some products may be clearly identified as suitably flexible for wood’s dimensional changes.  Water-borne coatings are generally more flexible than alkyds. Coatings containing urethanes tend to be more flexible than coatings containing acrylics.

For factory finishing with transparent coatings, with special considerations for UV and mildew control, please see our fact sheet Factory Finishing with Transparent Coatings: Requirements for Maximizing Longevity.

Special Considerations

If a coating is desired for a wear surface such as a deck or stairs, consult carefully with the coating manufacturer to choose the right product for this demanding application.  All coatings will be challenged by foot traffic and increased exposure to weather in a horizontal application.  High traffic routes will show wear faster than other areas. Paints and other thick film-formers may fail quickly in this situation, and a time-consuming refinishing process will be necessary each time the coating fails.  Hence many people will find a stain the more convenient choice for decks and stairs.

Knots may require a bit of extra care as some wood extractives or resin may leach out or bleed. Extractive bleeding can cause discolouration, but this can usually be prevented by applying special stain-blocking primers. In some species, especially the pines and Douglas-fir, knots and pitch pockets contain resin. The resin can bleed and may discolour the finish, leave hard beads of resin on the surface, or may otherwise interfere with the coating bond. The best way to prevent this is to purchase kiln-dried wood where the resin should be set (hardened and fixed in place). If painting is desired, choose higher grades of lumber as these will have fewer knots, and choose kiln-dried lumber if using a resinous species.

If siding or sidewall shingles are to be painted, the US Forest Products Laboratory (USFPL) recommends they be backprimed.  This application of a coating to the back side will plug the wood pores, preventing extractive bleed without blocking water vapour transmission and also preventing liquid water uptake.

If possible, round out any sharp corners for best coating adhesion on these edges – for example, a square-edged stair tread will show coating degradation quickly, but bullnosed stair tread edges will retain a coating much longer.  This is because a coating applied to a corner tends to pull away from the corner, leaving a much thinner layer there than elsewhere.

Surface Preparation

Durability of any finish is highly dependent on proper application, which includes good preparation of the surface to be coated.  Specific details on surface preparation depend on what condition the wood is to begin with – read on for tips that apply to various scenarios.

Surface Preparation for Fresh Wood

While fresh, clean wood can be coated without surface preparation, a light sanding with 100 grit sandpaper (and dust removal) can double the service life of some water-based coatings. For best results apply a coating to a fresh wood surface as soon as possible after planing or sanding.  If exposed to rain and sun for more than two weeks, adhesion of coatings will not be as good. The surface must also be free of anything that will interfere with coating adhesion, such as dirt, damaged wood fibres and moisture. Grade stamps on wood should also be removed before applying a semitransparent stain, preferably by sanding.

Cleaning

If there are discolourations caused by dirt, iron stains or other discolourations on the wood surface, cleaning may be desired. It is always preferable to achieve cleaning with sanding when possible.  Another safe way to clean wood without damaging the surface is to simply use a garden hose, with or without a pressure nozzle.  Use pressure-washing only with extreme care as it can damage wood, especially low-density species such as western red cedar.  The pressure should be kept at a minimum, and never hold the nozzle in one place for a long time.  If necessary, use a little bit of dish detergent, and lightly scrub (not with steel wool, as this will leave iron stains) in the direction of the grain for any stubborn discolourations.  For discolourations that resist soap-and-water cleaning, chemical cleaners will be effective.  The chemicals in commercial wood cleaners can be caustic soda (sodium hydroxide), sodium metasilicate, oxalic acid, citric acid, phosphoric acid, borax or some mixture. Wood cleaners containing caustic soda at a 1% –  2% solution will remove nearly all discolourations with the least damage to wood. Some acid cleaners are especially effective for removing extractive stains and iron stain.  Bleach is commonly used for cleaning wood, but we do not recommend this, since a poor wood substrate will usually be left behind for subsequent coating.  Resin (pine pitch) can be generally removed with mineral spirits. Please note that all acidic or alkaline chemicals need to be thoroughly rinsed off before coating. Chemicals can be toxic, corrosive and harmful, so handle all these chemicals with care and follow all manufacturer’s instructions.

Surface Preparation for Aged Wood

Wood coatings need a fresh surface or the coating simply won’t last. The longer wood has been allowed to weather, the poorer the coating adhesion. If a fresh surface is allowed to weather or age outdoors for more than two weeks, coating adhesion will deteriorate. This is mainly due to wood damage from sunlight. Weathered wood surfaces usually have a higher acidity, higher contact angle, and lower surface energy.

Restoring an aged wood surface is necessary before applying a coating.  The damaged (aged/weathered) wood fibres must be removed, exposing fresh wood.  Also, any discolourations will typically be removed along with the damaged fibres, so the process of restoration is simultaneously a cleaning process.  Wood restoration can be achieved with sanding or with chemicals, but sanding is always preferable when possible.  Sanding can be done by hand or machine until the true wood colour shows. Then brush off the sawdust and apply the coating immediately.  For many jobs, a chemical method will be far easier.  Read the label of each product to identify the active components.  In general, caustic soda (sodium hydroxide) is the best chemical choice for both cleaning and restoration.  It effectively removes weathered wood fibres from the surface and leaves the surface at a suitable pH for coating.  Oxalic acid is also commonly identified as a wood restorer, however, it is only effective at discolouration removal and does not remove the damaged wood fibres from the surface – in other words, it is not restoring the wood to be an appropriate substrate for a coating.  However, oxalic acid can be used to return the original wood colour after the use of sodium hydroxide.  Sodium hydroxide will slightly darken the wood, and, if this is undesirable, simply rinse the wood with oxalic acid after restoration with sodium hydroxide.  Please note that all these chemicals must be handled with care and all manufacturer’s instructions should be followed, as the chemicals can be toxic, corrosive and harmful. Where the wood is close to plants, wet down the leaves with a garden hose prior to and after chemical use. Wood surfaces should also be thoroughly rinsed with water before coating.

Maintenance

Maintaining a coating means giving it a wash occasionally, watching for signs that the coating is losing integrity, and applying a fresh coat before full failure sets in.  If a coating is reapplied before the last coat has failed, the stripping process may not be necessary. It’s time to apply another coat when paint has worn down to the primer, or if the coating colour has undesirably faded, or if the surface of water-repellent treated wood no longer beads water.  Then wash or brush off dirt and apply a new coat.  Any areas showing failure (the coating has lifted from the surface or cracked, or bare wood is showing) can be spot-treated.  Remove any loose pieces of paint and use sandpaper to feather the edges of adjacent sound paint so the transition won’t be evident through the new paint layer.  Also sand away any weathered wood.  For large scale failure, refinishing will be necessary. For all coating systems, there is a limit to the number of coats a surface can support. When the coating gets too thick, refinishing will also become necessary.

Refinishing

Refinishing a coating means stripping off the old coating and starting over.  This is necessary when large areas of the coating have failed, or the coating is getting too thick for refinishing, or if a decision is made to change the type of coating.  A coating has failed when it no longer adheres to the wood surface.  If the coating has bubbled, cracked, or peeled, it must be removed.  If the coating has simply faded but otherwise appears to still be well-bonded, it may not need to be removed.  When a change of coating type is desired, the new coating may be incompatible with the old coating – to ensure a good bond for the new coating, strip off the old one.  Remove coatings by sanding or with a chemical product.  Sanding has advantages over chemical stripping in restoring the fresh wood surface, but even if sanding is done by machine, it is still very labour-intensive for large painted areas typical of outdoor projects.  Sandblasting is not recommended except for large timbers and logs, as it will pit the wood and is hard to keep away from elements like window frames.  Powerwashing will only remove loose paint, leaving behind paint that is still adhered.  So, a chemical approach is generally regarded as the most effective and least labour-intensive way to strip a coating.  Sodium hydroxide at a 6% –  8% dilution is the recommended chemical for stripping – and offers the additional benefits of cleaning discolourations and restoring the wood surface at the same time.  Products containing sodium hydroxide are corrosive and should be prevented from touching skin. Follow manufacturers’ instructions.  There are also other chemical products for stripping coatings in the market.  After stripping with chemicals, always give the wood a final rinse with water.  Many projects will still require some light sanding around stubborn stains or heavily damaged wood.

1 2 3 4 5 6 7 8 9

Get Access to Our Resources

Stay in the loop and don’t miss a thing!

1
2
3

Get Access to Our Resources

Stay in the loop and don’t miss a thing!

What’s Your Occupation?

Help us personalize the content for you.

What Interests You the Most?

Help us personalize the content for you.

Filters

Persona Icon
Persona
Tags Icon
Tags
Annual Reports Plus Icon
Award Book Plus Icon
Case Studies Plus Icon
Free Publications Plus Icon
Magazine Plus Icon
Building Systems Plus Icon
Codes & Standards Plus Icon
Industry News Plus Icon
Why Wood (FAQ) Plus Icon
Wood Products Plus Icon
Acoustics Plus Icon
Design Examples Plus Icon
Engineering Plus Icon
Fire Resistance Plus Icon
Insurance Plus Icon
Mass Timber Plus Icon
Date Icon
Date
Line Separator